반응형
우선 DbTestActivity 를 Empty Activity 로 생성.
ViewBinding 으로 설정
class DbTestActivity : AppCompatActivity() {
    private lateinit var binding: ActivityDbTestBinding
    override fun onCreate(savedInstanceState: Bundle?) {
        super.onCreate(savedInstanceState)
        binding = ActivityDbTestBinding.inflate(layoutInflater)
        setContentView(binding.root)
    }
}
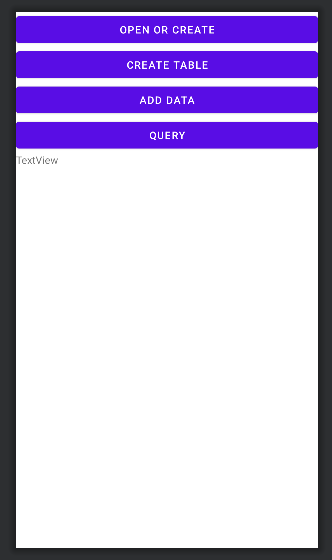
layout 의 root layout 을 LinearLayout 으로 변경하고,
4개의 버튼과 1개의 TextView 를 생성합니다.

그리고 버튼을 클릭했을 때
각각 기능을 실행 해보겠습니다.
첫번째 버튼
    <Button
        android:id="@+id/db_test_step1_button"
        android:layout_width="match_parent"
        android:layout_height="wrap_content"
        android:text="Open Or Create" />
클릭 시 DB open or create
DbTestActivity 에 전역변수로 아래 두개 추가
val databaseName = "score"
var database: SQLiteDatabase? = null
onCreate 에 버튼클릭 이벤트 설정
binding.dbTestStep1Button.setOnClickListener{ createDatabase() }
Database : open or create
    fun createDatabase(){
        database = openOrCreateDatabase(databaseName, MODE_PRIVATE, null)
        binding.dbTestOutputTextView.append("$databaseName 생성 또는 오픈")
    }
Create Table
두번째 버튼
    <Button
        android:id="@+id/db_test_step2_button"
        android:layout_width="match_parent"
        android:layout_height="wrap_content"
        android:text="Create Table" />
클릭 이벤트
binding.dbTestStep2Button.setOnClickListener { createTable("user_info") }
create table
    fun createTable(tableName: String){
        val sql = "create table if not exists $tableName" +
                "(id integer PRIMARY KEY autoincrement, " +
                " name text, " +
                " age integer, " +
                " mobile text)"

        database?.let{
            it.execSQL(sql)
            logView("Table $tableName Created")
        } ?: run{
            logView("database is null!")
        }
    }

    // 코드가 반복되므로 함수 생성
    fun logView(text: String){
        binding.dbTestOutputTextView.append("\n$text")
    }
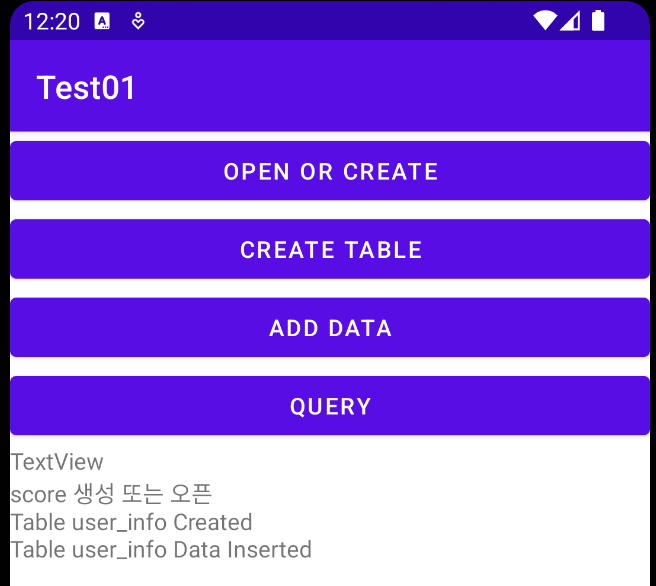
여기까지 테스트
[CREATE TABLE] 버튼을 먼저 클릭하면
database is null!
[OPEN OR CREATE] -> [CREATE TABLE] 을 차례대로 클릭하면
score 생성 또는 오픈
Table user_info Created
참고 : SQLite 컬럼 타입
| text, varchar |
| smallint, integer |
| real, float, double |
| boolean |
| date, time, timestamp |
| blob, binary |
Insert Data
세번째 버튼
    <Button
        android:id="@+id/db_test_step3_button"
        android:layout_width="match_parent"
        android:layout_height="wrap_content"
        android:text="Add Data" />
이벤트
binding.dbTestStep3Button.setOnClickListener { addData("user_info", "Hello", 10, "01011112222") }Insert 함수
    fun addData(tableName: String, name: String, age: Int, mobile: String){
        val sql = "insert into $tableName (name, age, mobile) values " +
                "('$name', $age, '$mobile')"

        database?.let{
            it.execSQL(sql)
            logView("Table $tableName Data Inserted")
        } ?: run {
            logView("database is null!")
        }
    }
참고 > query 의 value값을 직접 생성하지 않고, ? parameter 사용하기 링크
여기까지 테스트

execSQL 로 update, delete 도 합니다.
조회 (rawQuery)
네번째 버튼
    <Button
        android:id="@+id/db_test_step4_button"
        android:layout_width="match_parent"
        android:layout_height="wrap_content"
        android:text="Query" />
클릭 이벤트
binding.dbTestStep4Button.setOnClickListener { queryData("user_info") }함수
    fun queryData(tableName: String){
        val sql = "select id, name, age, mobile from $tableName"

        val cursor = database?.rawQuery(sql, null)
        cursor?.let{
            while (it.moveToNext()){
                val id = cursor.getInt(0)
                val name = cursor.getString(1)
                val age = cursor.getInt(2)
                val mobile = cursor.getString(3)
                logView("$it : $name $age $mobile")
            }

            logView("아이템 조회 완료")
            it.close()
        } ?: run {
            logView("database is null!")
        }
    }
728x90
반응형
'Android' 카테고리의 다른 글
| [Kotlin] SQLite 에서 statement ? parameter 사용하기 (0) | 2023.08.16 |
|---|---|
| [Android]Kotlin - WebView 사용하기 (0) | 2023.08.16 |
| [Kotlin] Android Camera 사용하기 (0) | 2023.08.04 |
| [Kotlin] Json String (List) 을 Data Class 로 변환 (GSON) (0) | 2023.08.02 |
| [Kotlin] HttpUrlConnection 사용하여 api 호출하기 (0) | 2023.08.02 |


댓글